Firstly, well done on your excellent Googling skills! You probably landed here because you were looking around for how to build upcycled furniture and maybe how to make extra money from home selling this.
What you are about to read below, is what I believe to be the most accurate and thorough upcycling guide that will teach you step-by-step to build upcycled furniture from scratch and how to make extra money at home.
To begin, let me introduce myself: My name is Luke Richardson and I run this site and have made all the upcycled furniture you can see on this blog.
I first started my upcycling odyssey when my girlfriend and I moved in together, into an unfurnished flat. We were in need of a kitchen table, but having blown all our budget on an incredibly comfy couch – there’s just some things you can’t skimp on! – we didn’t have any funds left for the style of table we wanted to go with our new place.
So I upcycled our own for less than £20. Not bad at all, considering the table we wanted to buy online was priced at £250 on Etsy.
I’m not going to lie and say my first project was all plain sailing, there was a couple of hiccups. Let’s just say it took me while to work out what the correct tools were to use for this job. I certainly got very familiar with the staff at Screwfix that weekend!
But by learning from my mistakes – so now you don’t have to – I can share with you exactly, in this in-depth guide, how to source and build your own upcycled furniture.
What is upcycling?
Upycling is the process of transforming useless or unwanted products into new materials. Or products of better quality and environmental value.
I find a number of my materials for free, from various online marketplaces or charity shops. But best of all, the ‘rubbish’ my neighbours have thrown away.
As the saying goes, one person’s trash is another’s treasure.
Here’s that table I was telling you about earlier, this is the perfect example of upcycling.
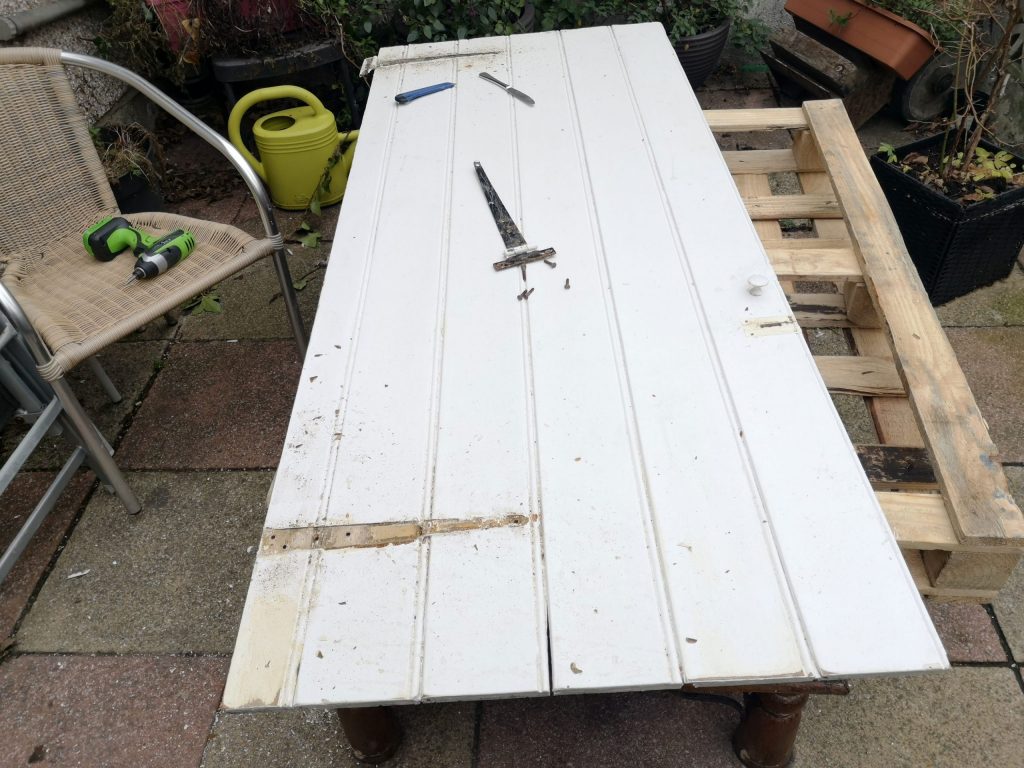
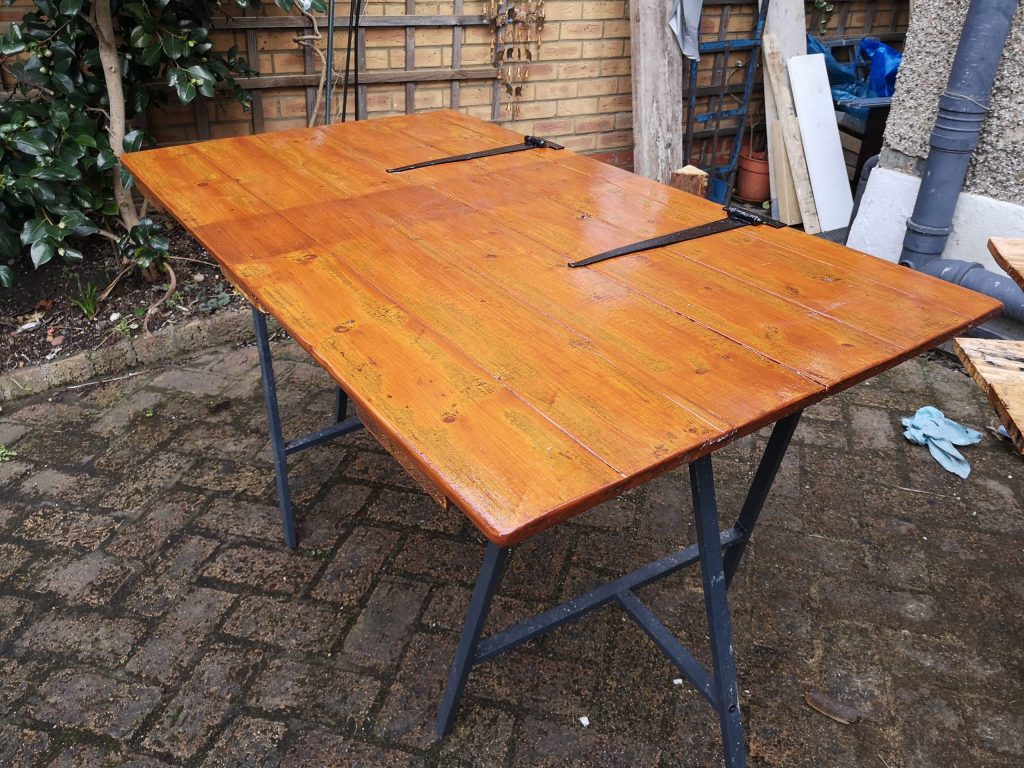
The ‘before’ picture is an old country farm style door, that I found discarded by the side of the road and had seen better days. The ‘after’ picture is the newly transformed dining table.
The satisfaction in upcycling a piece of old rubbish into furniture that’s used daily, and knowing I built half the furniture in my house from scratch, is the reason I’ve set up this blog. To let you know just how easy it is to do yourself whilst saving thousands of pounds and possibly earning a decent side income from doing it.
The other half of my furniture? Well that’s Swedish.
Before I go into detail on all the trade secrets I’ve picked up along the way, I’ve got a small confession to make. I’ve never ever undertaken any sort of professional woodwork training, nor have I completed a carpentry course.
I’m not only going to reveal my successful steps with you, I will be sharing how to make your designs a success from the very beginning – even if you have zero experience. Just like I once did.
In addition, once I’ve shown you exactly (with images and videos below) how to source materials to upcycle for free, I’m also going to share several examples of simple DIY upcycled furniture builds that you can start making yourself today from home.
What you are about to read is in-depth, educational, and I hope will give you exactly what you need to start upcycling professional grade furniture from scratch today.
Step 1: Furniture Ideas you can Build at Home
First things first, you’ll want to get an idea of the kind furniture or item you want to upcycle for your home or garden. This will help when sourcing upcycled furniture materials. As well as give you feel of what will work and won’t work in your design.
If you already have an idea of what you want to build, that’s great, if not, here’s some upcycled furniture examples that are easy to build for inspiration;
- Reclaimed Wooden Table with Hairpin Legs
- Bath Boards
- Cookbook Stand
- Reclaimed Wood Coffee Table
- Garden Pallet Sofa
- Blanket Box
- Garden Bench
- Cookbook Shelf
- Kitchen Table Bench
- TV Stand
Check out the rest of my upcycled furniture projects and pallet ideas for even more ideas to make, with easy to follow tutorials.
All my plans and tutorials are designed so they can be easily adjusted to fit the shape and style of your home, so everything you build will fit exactly where you want it to go.
Where to find free furniture to upcycle
Now you’ve got an idea of what it is that you want to build, how do you go about finding those upcycled furniture materials, and ideally, for free?
The best single piece of advice I can give you is finding materials on the streets for free, that other people have thrown away.
Once you start looking, you’ll be amazed at what great stuff people throw away.
That list of upcycled furniture I gave you above for inspiration were all built using materials found for absolutely free.
Be it from discarded wooden pallets, unwanted scraps of wood from building sites or old furniture / waste that people have left out in their front gardens.
Some, may be thinking, I don’t want to be caught rooting around other people’s rubbish or I haven’t got the time to do this. But if you’re willing to get over this initial apprehension, then you’ll be amazed at just what things you can find.
I’ve lost count of the number of times I’ve gone out for a stroll and come back with more than I can carry. I don’t own a car and have always found all these materials within walking distance of my house.
Luckily though, I do have an amazing girlfriend who has helped me out on more than one occasion with some of the more cumbersome stuff I’ve tried to get home alone!
This should go without saying, but please don’t just steal anything from outside people’s homes.
I always go by the rule, if it’s clearly been left by the bin then it’s free to take. If I’m unsure then I always give a quick knock on the door, and more often than not, you’ll find people are more than happy for you to take it off their hands.
I’ve even had people offer me lifts to help take it back to mine!
Building Sites
The same goes for anything left out by a building site. In this case, I’ll ask every single time if it’s not in a skip – again they’re just as encouraging, as it saves them a trip to the tip.
You’re not going to get lucky and find all the materials you’ll need for a project straight away using this method. I’ve often found one thing then had to wait a couple of weeks before finding the rest.
So, here are some shortcuts you can take…
Online Marketplaces and Charity Shops
If the thought of finding stuff on the streets is a little daunting, then online marketplaces such as Facebook Marketplace, Shpock and eBay are gold mines for finding upcycled furniture materials for cheap or free if you look hard enough.
I’ve had some great successes and you can adjust settings to your local area, select price ranges, search for items by category and tap into sources much quicker than street finds.
One of the great things with using Marketplace and Shpock is that you can easily haggle the price to your benefit.
Try to offer half the price of what they’re selling the item for, then haggle to meet somewhere in the middle of that.
Other online sellers I’ve had luck with are Gumtree and The Freecycle Network.
Also make sure to keep an eye on local seller groups in Facebook: these are separate from Marketplace.
Charity shops are another great source for seeking hidden treasures and your money goes to a great cause as well. Double win!
Best practices for deciding which materials to upcycle:
- Don’t pay over the odds for an old piece of furniture to upcycle. Remember to take into account all the hard work and other materials such as paint, wood screws, etc that will need to be factored into the price if you’re looking to sell it on. There won’t be much mark up if you’ve paid lots up front already.
If it feels too expensive, just walk away, there’s plenty more out there to upcycle for the right price.
- Plan ahead and make sure you know you’re going to get those bulky, heavy items home! Take advantage of Zip vans and 8 seater Ubers to transport stuff. Don’t be like me and carry dressers home on the tube during rush hour!
Top Tips for finding cheap reclaimed wood near me
Scaffold boards are fantastic to build furniture with and can be found online cheap enough, or if you’re lucky, out on the streets for free.
I’ve upcycled old scaffold boards into TV Stands, Clothes Rails, Benches.
They’re strong, come in a variety of different sizes and the timber maintains its equilibrium with the natural environment which ensures the wood does not begin to warp, bend or twist when exposed to the elements.
Scaffold board furniture is big business, you can find re-purposed board furniture selling for up to £7K online!
Crazy, considering you can pick up a 13ft scaffold board for about a tenner.
Obviously that price for the furniture is taking into account all the makers hard work, skills and graft, which should never be dismissed.
But with applying this guide, you too, will be able to make your own beautiful, expensive looking furniture in no time.
Reliable scaffold board suppliers can be found on eBay as well as from local sellers on Facebook Marketplace.
Also try local scaffolding yards, as they often have old boards to give away for free or on the cheap.
They’ll even drop them off at your home if you catch them on a good day.
How to find used wooden pallets near me for free
The best place to get wooden pallets, I’ve always found, is for free from the side of the road. Once you start looking, you’ll be shocked at what a roaring trade they are!
Also check local supermarkets, corner shops etc., as they always have an abundance of pallets, of all different shapes and sizes, that you can take off their hands.
Local markets – especially fruit & veg markets – have been a gold mine for me as well. At the end of the day traders leave their rubbish for the council to collect, and you guessed it, hundreds of pallets as well.
I’ve had refuse collectors come drop pallets off at my home on their way back to the depot, it saves them a job of unloading their truck at the other end. They’ve even gone out of their way to make sure I’m getting the best looking and strongest pallets.
You can also buy brand new wooden pallets online, but honestly I’ve never had to do this in all the time I’ve been upcycling pallets as it’s so easy to pick them up for free.
Facebook Marketplace is again also good for free pallets.
To dismantle a wooden pallet, you will need a hammer and crow bar to do the job properly. There’s some further information on those tools coming up next.
As with any wood, including reclaimed wood, it is a live material, and will respond to its surrounding environment.
You cannot 100% rule out your furniture having knots, twists, cracks, splits or warping.
That’s the beauty of working with natural materials, these imperfections add character to your pieces, but should be fully functional and stand the test of time.
Step 2 – Building: 9 basic woodworking tools you’ll need
Before you start building your project, you’re going to need tools to build with. I don’t have an expensive set up at all.
Here are the 9 basic tools you will need to purchase to be able to complete most woodworking upcycled furniture projects.
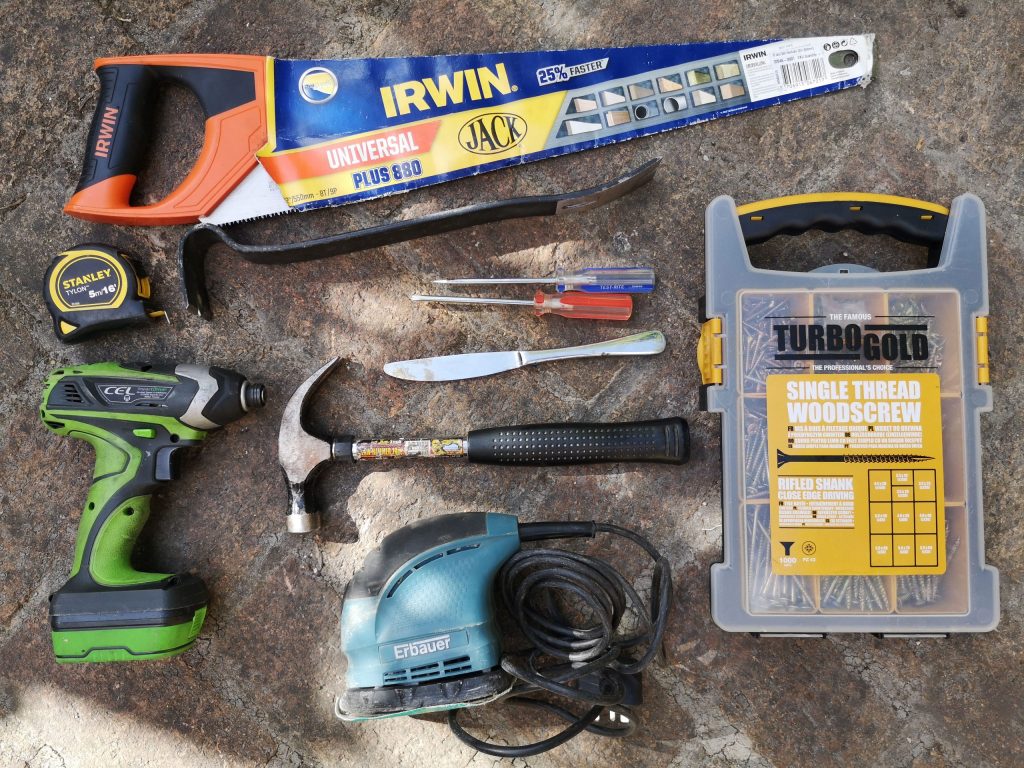
1. Electric Drill
I use a CEL UK Impact Driver 14.4V which has a 90Nm Torque to build all my furniture and comes with battery, charger and some drill bits for a mere £67.95 including delivery!
I could try and flog you another more well-known household brand where I could earn some commission, but I won’t, as I can’t emphasise enough just how good this drill is.
This is the most expensive item in my list, but it costs the fraction of the price compared to the leading brands, and in my personal opinion is just as good, if not better.
Not to be confused with a more common rotary drill (15Nm Torque), an Impact Driver is much more efficient than driving/removing screws and threaded fixings.
This basically means you won’t need to be drilling pilot holes every time you want to screw some wood together. This will drive screws straight into any hard wood with ease.
Another great thing about this tool is the battery – which rarely needs charging and when it does, charges full in under 15 mins – as it is compatible with a number of their other power tools.
So you can save another small fortune by only buying one battery and sharing it across their other tools in that range if you ever decide to branch out.
As the CEL Rotary Driver was so cheap at £22.90 (exc. battery and charging point), I bought this as well. But I only use the rotary drill for pilot holes in small or flimsy pieces of wood, as screwing straight into those can split the wood.
I’d recommend just buying the Impact Driver for now though if your funds won’t stretch.
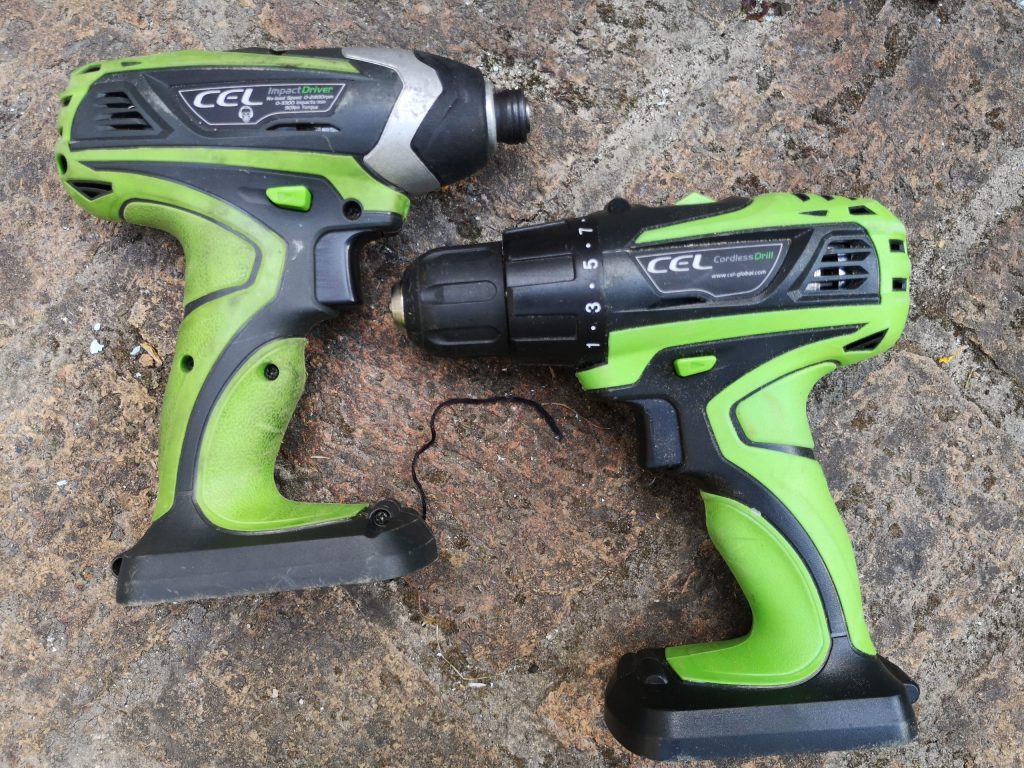
You can quite clearly see from the differences in colour of the impact driver on the left and how much it’s been used compared to the rotary drill on the right.
Wood Screws
You’ll be needing some screws to go with that drill, I picked up a TurboGold Woodscrews Trade Grab Pack from Amazon to start off with, then just top it up as and when needed with Forgefix Multi-Purpose Pozi Screws.
2. Hand Saw
I use an Irwin Jack 880 Universal Saw. I like to use lots of big chunky pieces of wood in my work and this cuts through those like butter.
One day I may invest in an electric saw, but I’m in no rush to do so, and enjoy the upper body workout it provides when sawing through larger pieces of wood.
When cutting straight lines through a large piece of reclaimed wood with a hand saw, you will need to fine tune your skills to avoid cutting through it at a tangent.
3. Tape Measure
Great for, err, measuring things. I use a Stanley 5m Tylon tape measure.
4. Screwdriver
It’s a good idea to have at least one Phillips and one Flathead screwdriver in your toolbox.
I recommend picking up one of either of these quality sets; Presch Screwdriver 7 Piece Set or this Durable 6pc Screwdriver Set for cheap from Amazon.
5. Hammer
Make sure you get a claw hammer, so it can also be used to help remove nails from reclaimed wood. There’s always various deals on Amazon available, you should expect to pay around the £10-£15 mark.
6. Sander
For a long while I had a sheet sander, which worked well enough, but the sandpaper used to tear quite easily and I found myself going through rolls at a high range.
Then as luck would have it, I found an detail sander whilst out one day looking for materials. All it needed was some new Velcro applying to the bottom and works a dream.
I wish I had invested in a detailed sander straight away as this sandpaper tends to tear much less and still does a good job.
These detail sanders come with a small supply of papers included but I recommend always having a selection of 40, 60 and 120 grits in your toolbox. as a project requiring lots of pieces of reclaimed wood can get through these quite quickly.
- 40 grit – for heavy sanding and stripping
- 80 grit – for smoothing surfaces and removing small imperfections
- 120 grit – I find this grit fine enough for adding smooth finishes to upcycled furniture.
If you’d also like to buy or prefer to use a sheet sander then one of these will work well with any woodworking home project.
Rather than buying individual sheets of sandpaper for these, it’s cheaper to buy a roll of sandpaper and then cut it to the appropriate length. You’ll be able to pick up cheap rolls of various grits from Amazon.
7. Crowbar
If you’re planning on upcycling wood pallets into furniture, then a utility bar -as they’re also called – is a must have for dismantling pallets.
If you’re not planning on using pallets, then I wouldn’t bother, as I’ve only ever used it for this job.
You’ll want to get a 15 inch utility bar.
8. Wood Work Bench
I put off purchasing this item at first as I was able to get away with using an old garden table and resting bigger planks between various objects.
When I did eventually get round to purchasing one, I really wished I had done it much sooner as it really does make wood work life much easier!
I picked mine up a lightweight portable workbench for cheap – and as you can tell by the extra wooden support hinges I’ve had to put in, it’s seen better day.
Adding those supports has made the bench even sturdier than before, but I’m going to be investing in a better workbench or possibly a saw horse very soon!
9. Butter Knife
Now this may seem like a strange addition to find in a 9 basic woodworking tools list, but trust me on this one, that knife has seen a lot more action than just scraping butter across toast.
They’re great for opening tins of paint, using as a scraper for glue/wood filler, scratching rust off metal and much, much more.
If I was a betting man, I’d say that you’ve probably already got one of these lying about your home as well. Just make sure you don’t take one from the good cutlery draw!
Now this may seem like a fair few tools to have to get at first, but you can easily make most of your money back on these as I did from my first sale, and now, they’ve paid for themselves ten times.
I’ve used just these tools across numerous upcycled furniture projects and the quality has remained consistent throughout.
So it is well worth investing just that little bit more money than finding a cheaper alternative.
Over time, you will eventually acquire more tools as you go from project to project, but using just those 9 basic tools you will be able to complete the majority of woodworking projects you can find on this site with ease.
Best paint for sprucing up furniture
You can get away with not adding a finish such as varnish, wood stain or wax to most reclaimed wood, but I always do, especially if it’s a piece I’m selling on or will be used daily, and definitely if it’s an exterior piece of upcycled furniture. These are the basic varnishes, dyes and paints I use in my projects;
Varnishes
I tend to use clear matte varnish on my upcycled furniture, as the finish is very subtle, it doesn’t have a shine compared to gloss and brings out the grain of the wood.
Satin varnish (also called eggshell) delivers slightly more shine than matte, but nowhere near as shiny as gloss varnish.
I use these two interior varnishes regularly;
And recommend these exterior varnishes;
- Rustins 1L Outdoor Varnish Satin – Clear (Amazon)
- Ronseal Exterior Varnish Matt Clear 750ml (Screwfix)
Wood Stains
If you want to stain your wood – change it’s colour to another style of tree pigment such as teak, mahogany, walnut or oak, then I highly recommend Ronseal Trade 10 Year Wood Stain Exterior. You will want to apply a wood stain to the wood then coat with varnish afterwards.
I use the Dark Oak stain a lot, it can really turn reclaimed pallet wood into beautiful aged oak style wood with just one coat. You can really see the difference on this piece below;
Metal Paints
Hammerite Paint – I use this paint on all my projects when using metal in my upcycled furniture that needs painting.
It paints direct onto rust and acts as a primer, undercoat and top coat in one. i.e. it only needs one coat!
The paint can be bought in a variety of colours, I particularly like the hammered range as it gives the metal a cool, textured look.
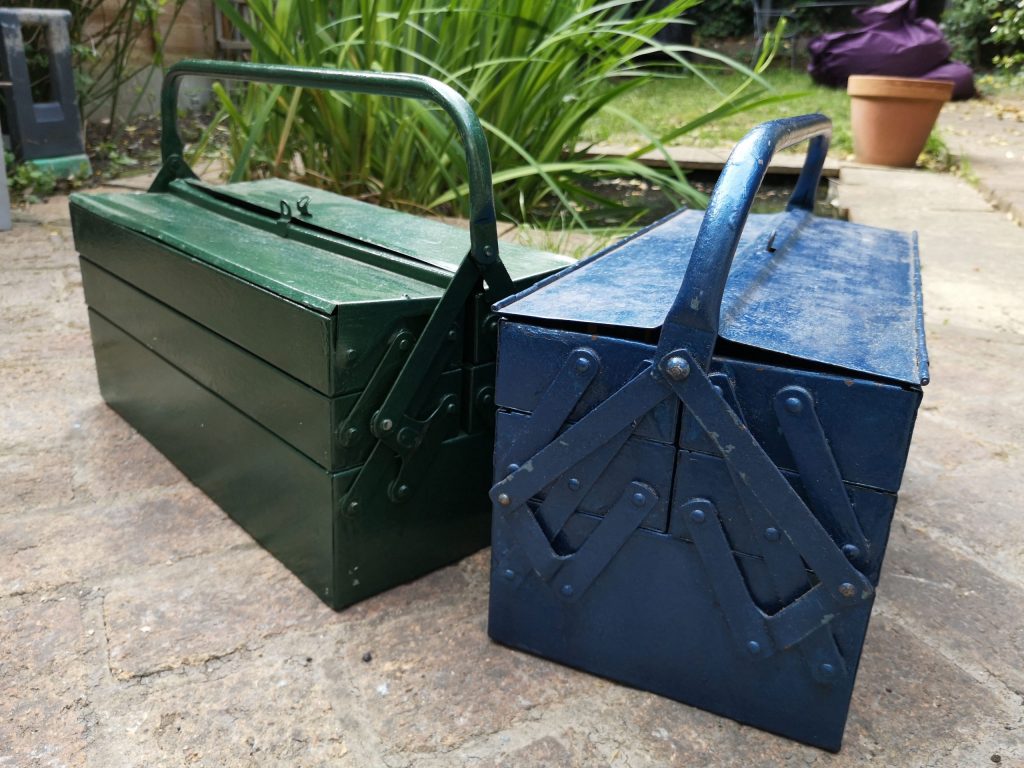
I used the blue hammered paint to upcycle an old, incredibly rusty, metal toolbox, which now looks brand new and very cool!
Obviously you will also need a set of brushes such as these Bizzwizz 5 piece set or this lower priced range of mixed paint brushes both from amazon, to add these finishes to your upcycled furniture projects!
Fixings and Hairpin Legs
There are a number of fixings, table legs and other support fittings I use throughout my upcycled furniture, these are the most frequent ones I use;
Hairpin Legs
These legs are incredibly popular and come in a variety of sizes and strengths.
I’ve used them on number of different pieces of upcycled furniture, from a TV stand to coffee table to a reclaimed wood dining table.
There are several companies selling these on eBay, I bought the ones I used for those projects from The Hairpin Leg Co.
You will want 14″ or 16” legs for a TV Stand and 28” for a dining table.
Brackets
I like to use big heavy duty, chunky brackets that can be bought from Amazon, as they give a cool industrial feel to the piece, incredibly strong and are a great shortcut for putting garden benches together or even scaffold board clothes rails.
I’ve used 63 x 90mm and 70 x 70mm brackets.
Coat Hooks
Give these hooks a coat (sorry!) of Hammerite paint , screw onto a nice piece of wood with a dark oak finish, to make a beautiful, rustic coat hook.
I sell these regularly for £25.
Check out this 10 pack of coat hooks on Amazon.
6 Common woodworking mistakes and solutions
Making mistakes whilst upcycling furniture is all part of the learning curve.
Rather than letting these frustrate and bring you down, revel and embrace them, and as EB White said “A mistake is simply another way of doing things.”
Here is a short long list of some of the mistakes I’ve made whilst building that have helped me to become a more competent builder;
1. Assembling timber, the wrong way round on furniture
On a large clothes rail for our bedroom there’s a beautiful, sunken knot on one side of the scaffold board, but only after putting the whole thing together did I notice that this was facing inward rather than outward and missed out on showing off it’s beautiful grain!.
I’ll switch it round one day, but will never make that simple mistake again!
2. Right tools for the right job
I’ve tried to cheat using the right tools for the right job on a number of occasions before I bulked up my toolbox.
Sometimes it works, but the majority of the time you can waste half a day when the right tool will have it done in minutes.
3. Incorrect measurements
Remember that door I told you about that I transformed into our first kitchen table?
Well, we sold that as I didn’t quite get the dimensions of the new kitchen right. I’d quickly measured the floor when we were viewing the flat and forgot to take into account the chairs and people that needed to sit around it.
This mistake stood me well, as I always double, triple check measurements as the slightest mistake will result in a less than perfect job. Remember, “measure twice, cut once”
4. Sawing less than straight lines!
Sawing a straight line using a handsaw through large pieces of timber without going off tangent is no mean feat. I’ve had to go back to the drawing board a couple of times and correct wobbly benches.
Top Tip: Draw pencil lines around every side of the piece of wood you’re going to be cutting a straight line through, then whilst cutting rotate every so often checking you’re sawing over the marked line. It will take a little practice but easy to do.
5. Splitting Wood with Screws
The majority of the time you’ll be fine getting away with just using your impact driver to drive screws straight into big pieces of wood without having to drill pilot holes first.
It’s when working with smaller, flimsier pieces you’ll need to make pilot holes to avoid splitting the wood.
Top Tip: As a general rule of thumb, pilot holes should be at least as large as the screw’s minor diameter.
I’ve previously mentioned that scaffold boards are often graded so that they do not begin to warp, bend or twist when exposed to the elements.
But you’re not going to be so lucky with much other reclaimed wood. It’s worth taking note that wood expands, contracts, warps, or bows based on the temperature and moisture content of its environment.
Make sure you leave room for expansion by letting the wood acclimatise to its new environment before you start building.
You can buy moisture meter’s to measure the moisture content of wood before upcycling reclaimed wood.
Top Tip: If you have the space, try and store your wood under cover in a damp free, dry area.
Simple woodworking plans to try at home
Now you know which mistakes to avoid, where to source materials (for free) and the 9 basic tools for upcycling…
It’s now time to actually build something!
Below are several upcycled furniture, DIY projects you can build for yourself, or sell, to earn extra money at home.
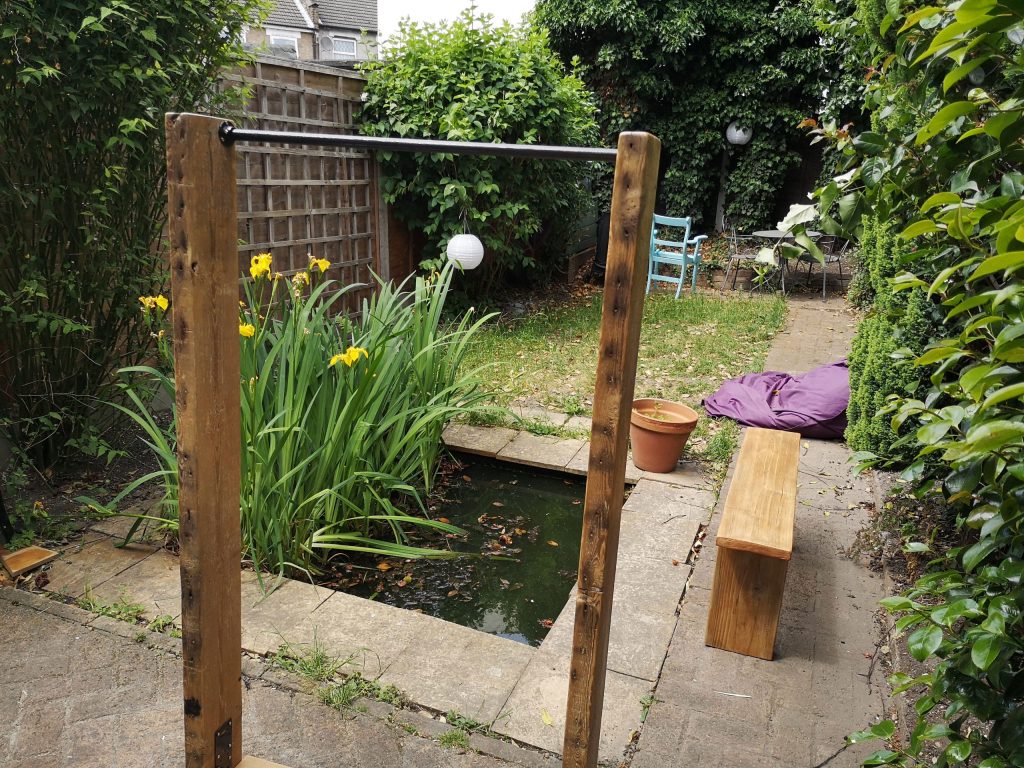
Industrial Pipe Clothes Rail
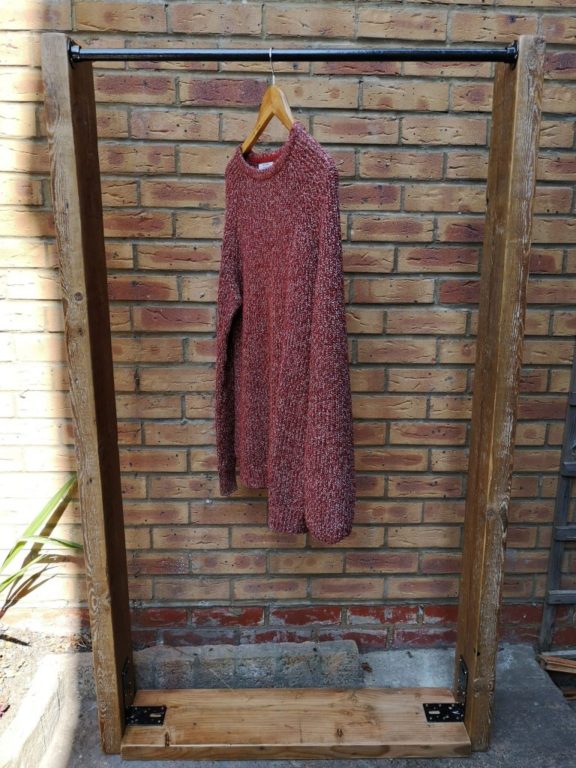
I built this heavy duty clothes rail using materials found on the side of the road. The reclaimed wood scaffold boards and an old clothes rail were found discarded by the side.
Reclaimed Wood Dining Table
I built this Reclaimed Wood Dining Table for £35.81.
Using old scaffold boards I was given for free from a local building site.
Pallet Garden Sofa
Over the years I’ve built a number of different pallet garden furniture ideas for my garden.
From pallet garden furniture sofas, to pallet tables and chairs.
TV Stand – Timelapse
In this time-lapse video, I built this TV stand using a scaffold board and hairpin legs, picked up for cheap on eBay.
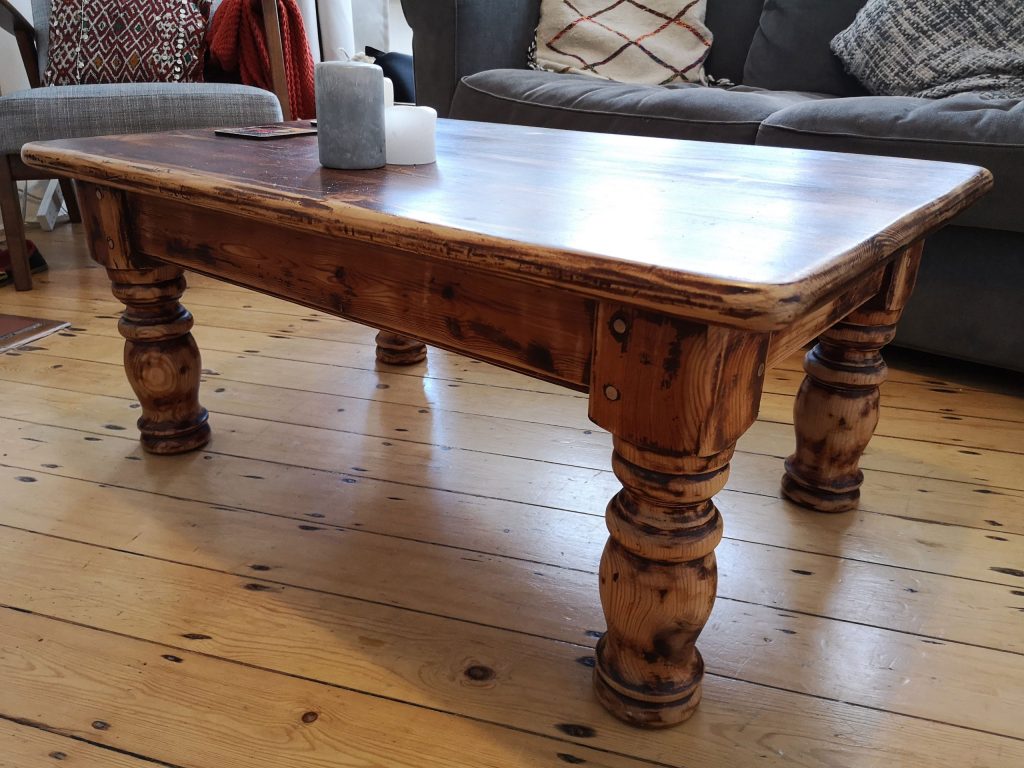
Rustic Reclaimed Wood Coffee Table
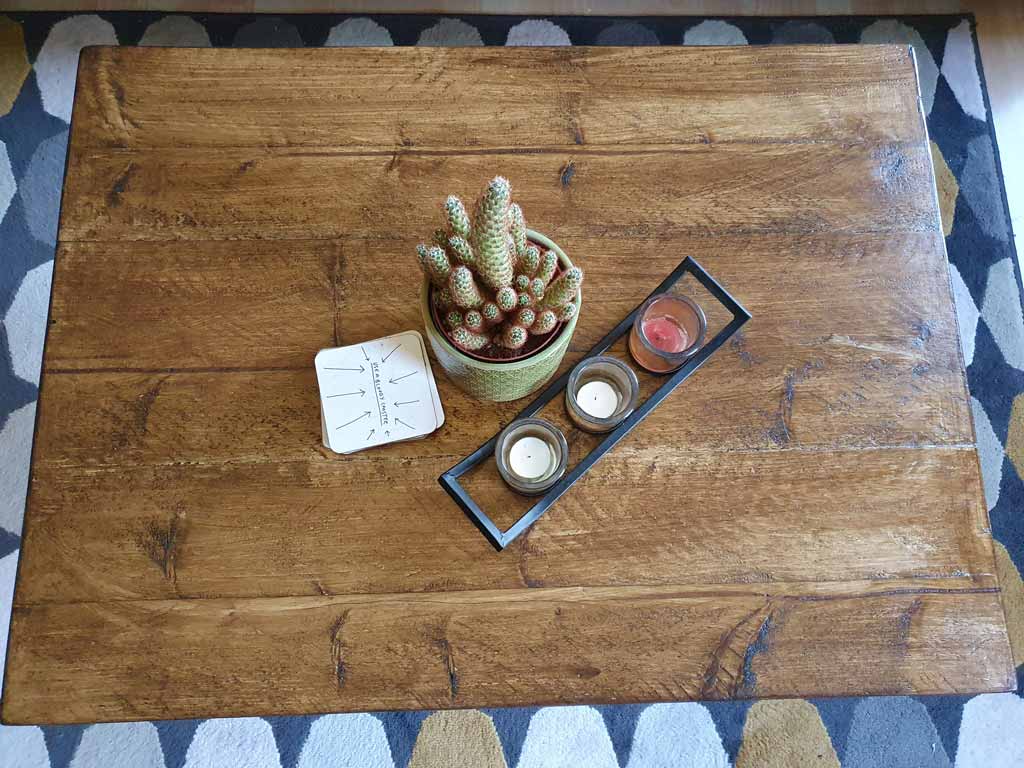
Bespoke reclaimed wood coffee tableI built for a customer, that is totally customisable.
Step 3 – Selling: How to sell your furniture online
Earlier on I mentioned eBay, Facebook Marketplace and Shpock as the best sites for sourcing upcycling materials and old furniture for cheap.
Well, it’s these platforms where I’ve also had the best success when it comes to selling on my transformed projects and how I make extra money at home.
When selling I always set the item price 25% higher than the final selling price I’m willing to take for it. This gives enough wiggle room for the potential buyer to haggle down the price should they try.
Using this method, the buyer will feel like they’re getting a better deal and saving some money when the price is haggled down. But also just as important, you’re selling the piece for a price you’re happy to sell for.
Overall you’ll get a much happier customer, and you’ll get a good price for all your hard work.
Win, win all round!
The higher price may put off some customers but overall, by marking my pieces in this way, I’ve had the most success.
If the item simply isn’t selling, you can then always mark down the price yourself to help gauge further interest.
A couple of these platforms highlight this price reduction on the listed item, so again, this looks like the customer is getting a better straight away without feeling the need to haggle the price and will be more inclined to put in an offer.
5 easy mistakes to avoid when selling refinished furniture
1. Bad Photos:
After all that hard work of upcycling a beautiful piece of furniture, this is the point where all that hard work can be easily undone. There’s nothing worse than a blurry, close up shot or a shot too far away that you’ll need a magnify glass to see it.
For your main, primary photo, you want to get a shot of the furniture in all its glory. Make it the focus of attention, try not to cut any of out of frame where possible.
Save close up shots for the secondary photos, where you should capture shots of a particularly nice piece of the grain in the wood or more interesting segments.
Try to take plenty of photos covering all angles of the front, back and sides of the piece as well.
Don’t frame like this!
Frame like this!
2. Messy Background:
Shoot the furniture against a neutral background, a white wall works wonders in accentuating a piece of furniture and making it stand out. Avoid cluttered, messy backgrounds.
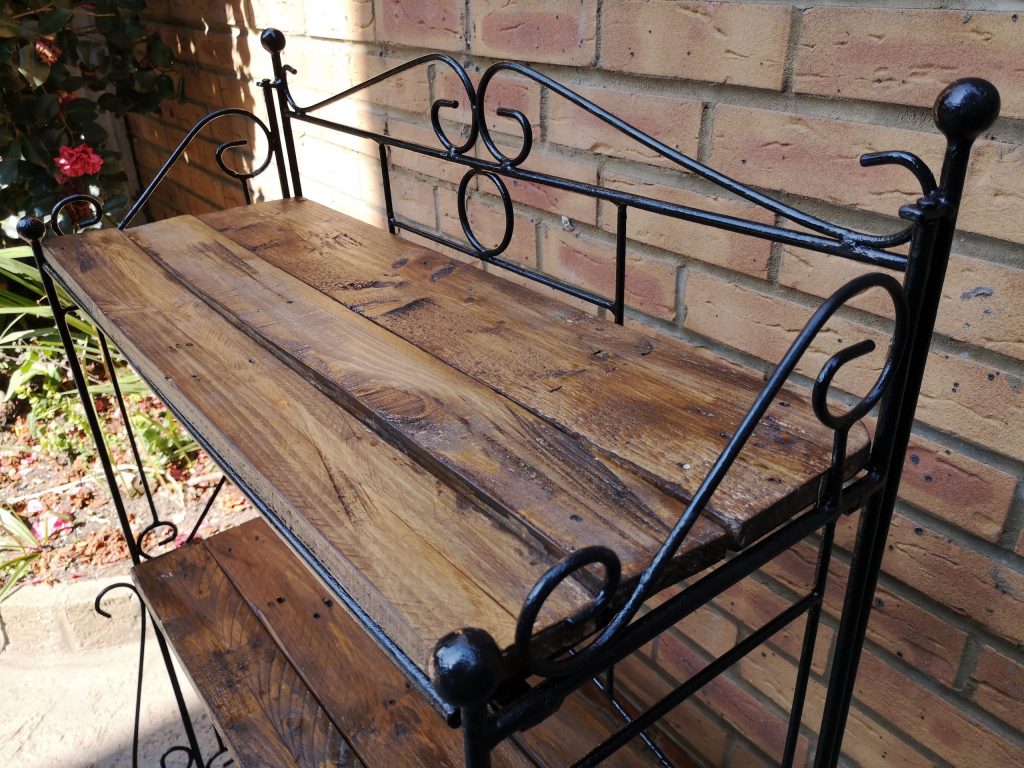
Try to take each case on its merit: lots of my pieces are industrial and rustic so work really well with some cool brickwork in my back garden as the backdrop.
3. Dark images
Good lighting is incredibly important. Where possible try to use a lot of natural light. Inside, the light will be easier to control, experiment and create mood lighting to really bring out the best features of the upcycled furniture.
With all this lighting going on, double check before taking the photo that you can’t see a shadow of yourself in shot.
4. Overuse of Photoshop
Annotating photos, using filters or adding a white background in post is fine.
But never alter the actual piece of upcycled furniture you’ve just built.
I know it’s common practice, but it’s not a true reflection of the piece and will only disgruntle the buyers when they come to see the item in person.
There’s nothing worse than travelling half way across the city to pick up a piece that looks nothing like the photo and has a huge blemish or crack that’s been covered up. Which leads me onto the next mistake…
5. Being dishonest
If the piece you’ve upcycled has a crack, dent or blemish, let people know this in your listing and factor this into the price of the item.
Use these to your advantage, you might be pleasantly surprised, I’ve sold pieces of furniture by highlighting the fact a piece of timber has huge holes in it from where I’ve pulled out large nails. They help give your upcycled furniture character and a more rustic, vintage feel.
6. Wrong setting
You’ll get much better results shooting ‘action’ photos of the furniture being used for what it’s intended for, ie. Hang some clothes up on a clothes rail – just make sure it’s not a dirty old pair of underpants!
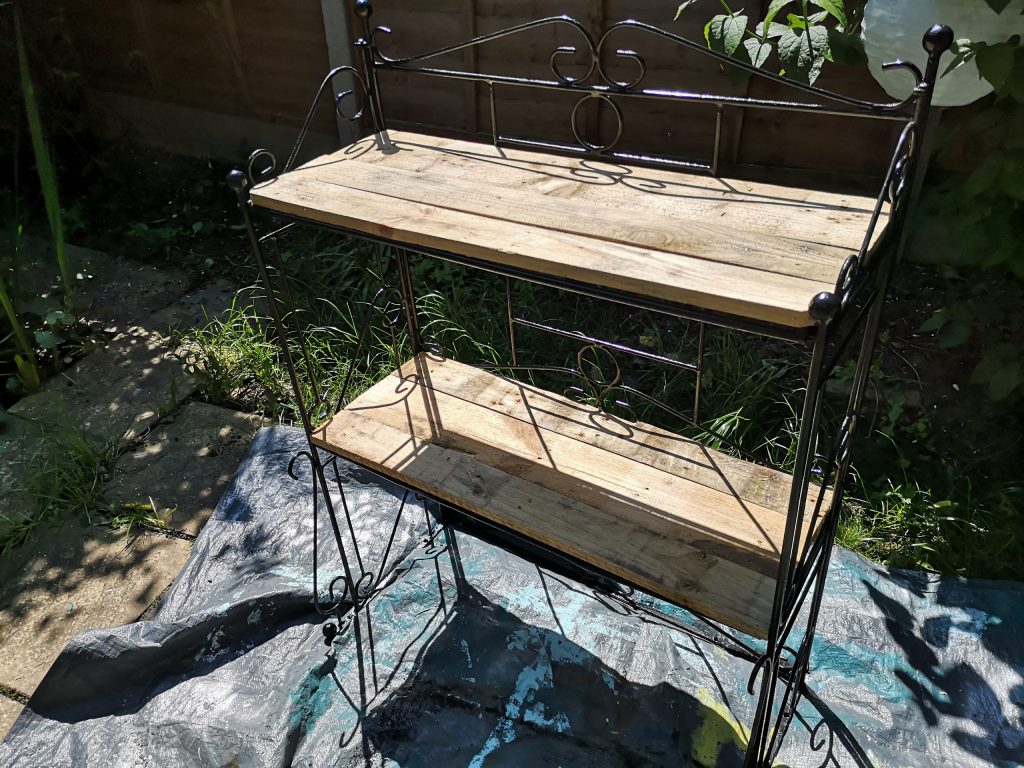
As a test, I first uploaded pictures of a beautiful French country style, kitchen shelf unit with bare shelves.
It didn’t get much interest.
The following week I added some Kilner jars full of pasta, rice and bottles of olive oil and took photos of them on there.
It quickly sold.
This method helps people visualise it in their homes better. Using books and plants are a great starting point.
7. Painting furniture in bright colours
Paint furniture in neutral colours – a lot of the time people will want to repaint the upcycled furniture themselves!
I’ve painted chairs in beautiful bright colours which never sold, but after biting the bullet and painting them in white, they got a lot more attention.
Where to Sell your Furniture?
There’s been an implosion of online markets over the years where you can sell your items online locally and nationwide. There’s the old guard eBay and Amazon, these can be quite advanced with lots of details to fill out, but here we will look at some others that are much simpler to use. And without fees!
Facebook Marketplace
A great free tool available on Facebook, with no fees for the items you sell!
Pros of selling on Facebook:
- Quick sales
- No fees incurred
- Weekly renewals so the listing gets ‘bumped’ to the top of the pile.
- You can post your item in various other FB seller groups at the same time.
Your friends can share the sale item amongst their friends, and so forth.
Cons of selling on Facebook:
- Lots of timewaster messages
- Have to rely on verbal commitment from person wishing to buy the item
- No integrated payment system – cash payment or have to send your own PayPal links.
Selling on eBay
Selling items on this platform is more time consuming than Facebook, but there’s a larger audience to reach and a much more trusted platform for selling.
Pros of selling on eBay:
- Huge audience
- Prompt payment
- You can setup an eBay store and link directly to your website. Thousands of other sellers use this platform as a store front, proving how effective it really is.
- Lots of structures in place to help with postage, delivery and payments.
Cons of selling on eBay:
- Dreaded monthly invoices for seller fees incurred
- Not as straightforward to sell items compared to others
Selling on Shpock
Another free to use platform, it’s the least known out of the above, but it’s simple interface makes it a no brainer.
Pros of selling on Shpock:
- No Fees
- PayPal integration
- Local buyers
- Easy to use interface.
Cons of selling on Shpock:
- App not that well known, so limited potential customer reach.
- Can take a long time to get replies to messages.
Facebook Marketplace Vs eBay Vs Shpock
| Facebook Marketplace | eBay | Shpock | |
| INTERFACE | Quick and easy to setup and can start selling straight away via either the FB app or on a web browser. | Fairly tedious and longwinded to setup if you’re not familiar with the layout. Once the basics are grasped, all the extra listing settings can be used to your advantage. | Simple to setup and start selling items straight away. |
| LISTING OPTIONS | One buy as seen price, though it’s possible for buyers to haggle via messaging. You can adjust the price, information and photos as much as you like. | Various different ways to list your items such as; Buy it now, Auctions and various automatic settings such as lowering prices can be implemented. | Same as FB, but with a built in make an offer option. |
| DO YOU PAY ANY FEES OR MEMBERSHIPS? | No | eBay takes 10% of the final sale price. Plus, other various commissions if setting up various listing options. | No |
| MARKET REACH | FB has over 2 billion users with 800 million of those using Marketplace every month. However, marketplace works best with reaching out to buyers in your local area. The search radius can be set to 200km, but 15km is the sweet spot. | An incredibly trusted site with over 160 million, monthly active buyers. Great for reaching out to specialist buyers and selling items all over the UK. | The least well-known platform, which means it can take longer to sell items. Similar to FB for buyer radius range. |
| INTEGRATED PAYMENT TOOL | No | Yes – Paypal | Yes –Paypal after linking your account |
| WHAT SELLS BEST? | Great for selling bulky items to local buyers. Garden pallet furniture sells very quickly if in the right season! | Best for selling items to a more specific buyer that can be posted easily. Possible to sell bulky items but have to take expensive postage fees into account if selling to people afar. | Small items with a lower price range. |
| SELLER PROTECTION | Buyers mainly pay with cash on arrival. Or you can send PayPal links for them to pay digitally, or if you’re trusting you can send them your bank account details. I’ve had a couple of no shows and people pull out of deals last minute, but on the whole trustworthy buyers. | You can start unpaid item cases if buyers don’t pay up after winning auctions or selecting buy it now. eBay have a 30-day money back guarantee which helps reassure the buyer. Also payments are made via PayPal, and there’s plenty of further protection schemes provided here. | Much higher percentage of no shows compared to FB. However, there is a legal commitment to buy once you’ve accepted an offer from a buyer – but, I’m not sure how well someone not turning up to buy an upcycled bath caddy will stand in a court of law! |
| LOWDOWN | Quick and easy to set up. I’ve had furniture sell within an hour of it first listing – once you know what sells best on here! | Best for getting a sale on harder to sell items and for getting a higher price for your furniture. | I tend to use this app more for finding, than selling, these days. Great for finding unusual items and lots of free stuff people want getting rid of quick. |
In conclusion
Selling upcycled furniture online can be a great side hustle to earn some extra cash. Using materials found near you and with a budget range of tools, you’ll be brining in the quids in no time.

Read our full story so far
ABOUT LUKE RICHARDSON
Luke is the chief maker of all the reclaimed wood furniture at Project Reclaim – a small family business that he set up in 2019. He is dedicated to using sustainably sourced materials and helping people bring their furniture ideas to life – as well as helping others DIY their own furniture, using materials around them.
Shop our full range of reclaimed wood furniture.
Subscribe to our newsletter